I keep my nail art brushes in a small container with my paint tubes. They were getting knocked around and losing the clear protector tubes so I needed to make a brush holder. This is a small sheet of plastic canvas laced through with elastic thread and tied in the back.
Showing posts with label Tutorials. Show all posts
Monday, April 15, 2019
Monday, February 6, 2017
How to Bullet Journal an Adventure Path / Campaign
Note: This post contains spoilers for the Pathfinder Adventure Path #97-102: Hell's Rebels. If you plan to play that adventure, and want to be surprised don't read the written text in the photos.
Also If you've never heard of a bullet journal, take a moment and go check out bulletjournal.com.
Now that you're back, you need a a few things to make your own journal. A notebook, a writing implement, a straight edge (ruler or spine of a gaming book), and possibly something to make quick reference tabs. I used a regular college ruled composition notebook, and just looking through the ones that I own these seem to come with between 80 and 100 pages. I'm going to go through the pages in my bullet journal with you in order.
This is my AP bullet journal.
Monday, November 28, 2016
Make Your Own Texture Paint
I like the texture paint that citadel released in their most recent paint line. After testing it on a few bases I realized that it would take far too many pots to do an entire army so I made my own.
Make texture paint
You will need:
Make texture paint
You will need:
- Empty paint pot or airtight jar (I used an empty dickinson's honey jar)
- Acrylic paint in the desired color of your base (craft paint is fine)
- Liquitex resin sand
- Sand (blue stuff in the container on the right)
- Ballast (off white stuff in the container on the right)
- Mixing tool
- Feline assistant (optional)
1. Start by partially filling your jar with acrylic paint. You want enough to color the texture paint, but not make the mixture too runny. Err on not enough paint because you can always add more.
Add the sand and ballast to half fill the jar.
Add the resin sand leaving enough room in the jar to mix everything together.
You should have a chunky paste that spreads easily. Determine if you need to add more paint or sand and ballast. If not top off the jar with more resin sand, and finish mixing it all together. It's okay if the color looks lighter than the paint as it will dry darker
Friday, August 26, 2016
Basket Weave Tutorial
This vase miniature is a Hirst arts block from the Common Inn Accessory mold #58, but you could use this technique on any round or squared shape. I painted this piece to be a woven laundry basket for a little vignette I'm making to display some fantasy miniatures. So I added a sock hanging down the side, and some more fabric inside made out of green stuff.
1) Start by base coating the pot a medium brown color (Games Workshop: Graveyard Earth / current color = P3: Gun Corps Brown). Using a tan color (Games Workshop: Kommando Khaki / current color = P3: Hammerfall Khaki) paint lines on the bottom in a wheel pattern.
2) Continue the tan lines up the sides of the pot. You may need to add more lines to fill in the sides just be sure to add an even number of vertical spokes.
4) Using a dark brown color (Citadel: Rhinox Hide) paint a thin line along the bottom and right side of the horizontal line. You will be painting over one of the vertical spokes.
5) I don't have a picture of this step because I didn't realize it was blurry. You will be using a light tan color (Games Workshop: Bleached Bone / current color = Citadel: Flayed One Flesh) to paint a thin line along the top and left side of the horizontal edge.
6) When you have finished the middle horizontal line, Paint another horizontal line
above and below the first. Highlight and shadow these lines like the first, but offset by one spoke.
7) Continue this pattern towards the top and bottom of the pot. Be mindful that the pattern will wrap inside the pot, and that you will need to reverse the direction of the highlights and shadows on the inside.
8) After finishing the pattern, apply a coat of a sepia colored wash (Army Painter Soft Tone) to shade the basket. Focus the wash more towards the bottom and inside of the basket.
1) Start by base coating the pot a medium brown color (Games Workshop: Graveyard Earth / current color = P3: Gun Corps Brown). Using a tan color (Games Workshop: Kommando Khaki / current color = P3: Hammerfall Khaki) paint lines on the bottom in a wheel pattern.
2) Continue the tan lines up the sides of the pot. You may need to add more lines to fill in the sides just be sure to add an even number of vertical spokes.
3) Using the tan color paint one horizontal line across the middle of the pot.
6) When you have finished the middle horizontal line, Paint another horizontal line
above and below the first. Highlight and shadow these lines like the first, but offset by one spoke.
7) Continue this pattern towards the top and bottom of the pot. Be mindful that the pattern will wrap inside the pot, and that you will need to reverse the direction of the highlights and shadows on the inside.
8) After finishing the pattern, apply a coat of a sepia colored wash (Army Painter Soft Tone) to shade the basket. Focus the wash more towards the bottom and inside of the basket.
Monday, July 4, 2016
Hirst Arts Hacks
I own quite a few hirst arts molds, and have come up with a helpful tips.
1) Fieldstone Walls
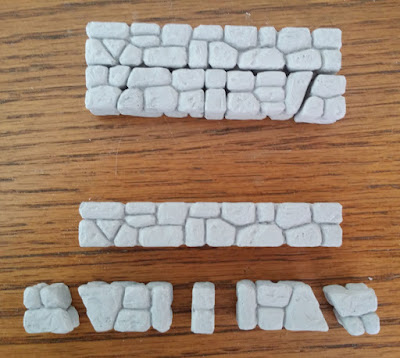
If you are working on a project with a looming deadline, and need lots of fieldstone walls cast yesterday, you can use other molds to make blocks beyond the basic fieldstone mold.
a) You can use the blocks from the flagstone floor mold glued back to back to make a 1"x1"x1/2" block. Yes it looks noticeably different from a fieldstone wall, but if you are working on a project with a "basement area" this will work well for the lower portion. Also it makes for a wall with a completely flat top due to the scrapped side being sandwiched inside the blocks (no irregular block heights).
b) You can use the fieldstone rubble mold to make blocks. It takes two castings to get complete blocks, but every little bit helps if you're on a deadline.
c) If you have the Octagon tower mold, you can use the straight sections to make long blocks.
The long/short angle sections along with a 1/4" block make a 3" long wall section (3" wall block shown on the top).

Two long angled sections along with a 1/4" block will make a 4" long wall section (1" + 3" wall shown on the top).
2) Waste Nothing
I put a plastic trash bag down over my table when I cast. This catches all the plaster that gets scrapped off. All the plaster bits and dust go into this plastic bowl (I also unmold my blocks over top of it). I break up the pieces and then I can add them to large blocks when I cast them. I usually use this for large molds like the cavern mold and the space corridor edging mold. I fill the molds about half way with plaster, and then add the dry scraps to the blocks. Then I cover them with more plaster to top off the molds.
This is a picture of some holders that I use when painting miniatures. They are soda bottle caps so they already have a nice texture to the edges (these really help with hand fatigue). I fill them about halfway with scrap plaster, and add water. Then when I scrap my molds, I can drop the excess on top of these and scrap them off flat.
Some bottle caps in progress.
After these dry, I run them over some sandpaper to make sure they are smooth. Then I put two coats of high gloss varnish on them, and they are ready to have some minis stuck on them with some poster tack.
Subscribe to:
Posts (Atom)