Showing posts with label Hirst Arts. Show all posts

Monday, July 16, 2018

Pathfinder Iniative Tracker

I saw this tutorial for a DIY Initiative Tracker on Geek and Sundr, and thought it would be really useful for my home game. It is made using blocks from the 3" tower mold by Hirst Arts. The blocks are dental plaster so the base is well weighted. The dowel is removable and the pins sit in the top part of the tower when not in use.


Monday, June 12, 2017

Minitaire Paint Storage Shelf Finished

So here is the final product in use. I really like having the extra space to keep all my large bottles of medium/varnish within reach. I left the back corners open so I could loop the charging cord for the dremel tool (far left side) through it. It was a great deal of work, but I'm very pleased with how it turned out.

Some other pictures without the trays.


Paint Storage Shelf Update 5

Monday, June 5, 2017

Minitaire Paint Storage Shelf Update 5


 I finally finished casting and assembled the paint tray shelf. You can see in the second picture that I have a few little gaps left to fill. After that I can start priming it with some black acrylic paint.
 

Paint Storage Shelf Sketch
Paint Storage Shelf Update 4
-
Paint Storage Shelf Finished

Tuesday, May 2, 2017

Minitaire Paint Storage Shelf Update 4

So I'm making good progress on the final paint tray layer, and then assembly can begin. I've made a bunch of wall pieces while casting the floor mold, so hopefully I will have enough of those ready to complete the project.


-

Thursday, April 27, 2017

Minitaire Paint Storage Shelf Update 3

I finally finished casting the paint tray shelf top. As soon as the last blocks dry I can glue it together, and get to work on the bottom shelf layer. I plan on using smaller sized blocks so hopefully that one will progress much faster.

Monday, April 3, 2017

Minitaire Paint Storage Shelf Update 2

I've finished the trays, and I'm now working on the shelf holder. Here is my progress so far. The top will be double sided hirst arts fieldstone floor tiles. After this is finished I will need to make a third sheet to be the base. I have to finish these first before gluing on the walls so that they match up correctly. I really wish I had more than one mold so this could go faster.


Monday, March 27, 2017

Dark Angels Terrain Series Part I

These are the first pieces in some Dark Angel terrain that I've been working on. This building is a Pegasus Hobbies #4925 Gothic City Buildings Small Set #2. I've used some corrugated scrapbook paper for the roof.

Another angle of the building.

I based the stained glass windows on the shields of the Deathwing knight models.

I used another sheet of scrapbook paper placed behind the windows on each end of the building.

These are some statue columns I made using hirst arts blocks and some sculpty. I plan on making a larger terrain piece and attaching the columns to it with magnets for transport. The sculpty clay was much softer than the super sculpty I'm used to, and the robed figures turned out kinda doughy looking.

A close up of the column statues. Again I based them on the knight shields.

Thursday, March 2, 2017

Monday, February 27, 2017

Hirst Arts Paintbrush Holder

Here is another paint brush holder I made with Hirst Arts blocks. It uses the 4" round fieldstone mold, and the inner dividers are made using the Wooden Plank mold.


Here is a picture of cast pieces ready for painting and a top down diagram for how they are arranged if you would like to recreate it.

Monday, February 20, 2017

HIrst Arts Mold Storage Boxes

I picked up a couple Iris Photo Boxes to store my Hirst Arts molds. I had them in a cardboard box, but I worried about them being stored in stacks. Each box has 16 cases which fits one regular mold, or two short molds (like floor tiles). Then I printed out some labels and taped them on.

Wednesday, February 15, 2017

Miniataire Paint Storage Shelf Sketch

I've already posted pictures of my rainbow scrapbook storage roller where I keep my paints. Unfortunately, my minitaire paint bottles are too tall to fit in the trays, and storing them on their side wastes a lot of space. I've designed some storage using Hirst Arts blocks to sit on top of my computer hutch so they will at least be within reach while I'm painting.

I sketched out the tray design. The middle drawer is slightly smaller to make sure it fits on the hutch.
Here are the drawers assembled with two primed. I'm starting with the drawers first and building outward to make sure everything fits together and has enough room for the paint bottles. I would hate to do all this work and have the trays fit the holder, but end up being too small.
 

Monday, February 13, 2017

Hirst Arts Pen Holder

I made several members of my gaming group pen and paintbrush cups out of hirst arts blocks. I customized them with some hand sculpted embellishments made with Das sculpting clay.


Monday, October 10, 2016

Shadow's Basement Vignette

Shadow's Basement Vignette

I made this as a display for some fantasy miniatures. Most of it is made of Hirst Arts blocks, but I've added some pieces sculpted out of green stuff. I'm very proud of how the rugs, pottery, and wicker laundry basket turned out.


Monday, September 12, 2016

40k Turn & Victory Point Counter

The base was made with hirst arts blocks, and the victory point counter dice are polymer clay. The turn counter is polymer clay over an aluminum foil core.

40k victory point and turn counter by Knitfink

Monday, August 22, 2016

Space Hulk Set - Casting Finshed

I finally finished casting my Hirst Arts Space Hulk set. Here are all the pieces primed. I'm still deciding on the paint scheme. I want to do the flooring in steel, but I don't know if the edging would look better in blue or brass.


Monday, July 18, 2016

Monday, July 4, 2016

Hirst Arts Hacks

 I own quite a few hirst arts molds, and have come up with a helpful tips.

1) Fieldstone Walls
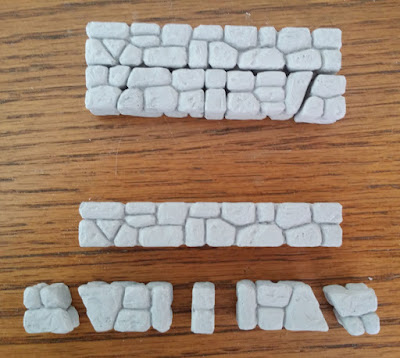
     If you are working on a project with a looming deadline, and need lots of fieldstone walls cast yesterday, you can use other molds to make blocks beyond the basic fieldstone mold. 
     a) You can use the blocks from the flagstone floor mold glued back to back to make a 1"x1"x1/2" block. Yes it looks noticeably different from a fieldstone wall, but if you are working on a project with a "basement area" this will work well for the lower portion. Also it makes for a wall with a completely flat top due to the scrapped side being sandwiched inside the blocks (no irregular block heights). 
     b) You can use the fieldstone rubble mold to make blocks. It takes two castings to get complete blocks, but every little bit helps if you're on a deadline.
     c) If you have the Octagon tower mold, you can use the straight sections to make long blocks.

The long/short angle sections along with a 1/4" block make a 3" long wall section (3" wall block shown on the top).
Hirst Arts Hacks by Knitfink

Two long angled sections along with a 1/4" block will make a 4" long wall section (1" + 3" wall shown on the top).


2) Waste Nothing
     I put a plastic trash bag down over my table when I cast. This catches all the plaster that gets scrapped off. All the plaster bits and dust go into this plastic bowl (I also unmold my blocks over top of it). I break up the pieces and then I can add them to large blocks when I cast them. I usually use this for large molds like the cavern mold and the space corridor edging mold. I fill the molds about half way with plaster, and then add the dry scraps to the blocks. Then I cover them with more plaster to top off the molds.

This is a picture of some holders that I use when painting miniatures. They are soda bottle caps so they already have a nice texture to the edges (these really help with hand fatigue). I fill them about halfway with scrap plaster, and add water. Then when I scrap my molds, I can drop the excess on top of these and scrap them off flat.
Hirst Arts Hacks by Knitfink

Some bottle caps in progress.
Hirst Arts Hacks by Knitfink

After these dry, I run them over some sandpaper to make sure they are smooth. Then I put two coats of high gloss varnish on them, and they are ready to have some minis stuck on them with some poster tack.
Hirst Arts Hacks by Knitfink

Thursday, June 30, 2016

PotM June 2016: Senet Board game Part 3

This is the first project of the month that I haven't finished this year. I was in an accident recently, and the stress of dealing with that didn't leave me in a very creative space.

I did manage to get some paint on the senet board with my airbrush, but it's barely more than base coating and some highlighting. I'll just have to consider the painting of the senet board a separate project from the assembly and come back to it later.

So far I've used Minitaire paint in Muddy Brown, Cracked Leather, and then Mummy