Monday, July 18, 2016

Friday, July 15, 2016

Brocade Dice Bag

A commission six pocket dice bag made with a black brocade fabric. Threaded with satin ribbons and handmade polymer clay pull stops.
Brocade Dice Bag by Knitfink

A look at the inner dividers.
Brocade Dice Bag by Knitfink

Bag Bottom

Monday, July 11, 2016

Rust Pointe Terrain - Assembly

I bought my husband this set of Rust Pointe Terrain for his birthday last year. We plan to orkify the buildings to serve as terrain for his 40k ork army.

Such nice packaging.
Rust pointe terrain haul

Here are all the pieces assembled and coated in shellac. The building on the upper left is my attempt at brush painting. I don't think it turned out very well, and I'm going to try using my airbrush after the detail pieces get attached.
Rust pointe terrain by Knitfink

Friday, July 8, 2016

Love Letter Zippy Pouches

Love Letter is a great game to take to a restaurant. It doesn't take up much table space, is quick to play, and easy to teach to new players. I like to keep a copy in my purse, but some versions are not very purse friendly.

I made this pouch for the Hobbit version. I painted on the logo to match the box. I was doing so well with the fabric paint until I dropped the paintbrush. Then I figured I would paint Smaug over the mistake.
Hobbit Loveletter Zippy Pouch by Knitfink

This version had a nice pouch, but it kept coming open, and the cards would spill out in my purse so I added a zip.
Munchkin Loveletter Zippy Pouch by Knitfink

Monday, July 4, 2016

Hirst Arts Hacks

 I own quite a few hirst arts molds, and have come up with a helpful tips.

1) Fieldstone Walls
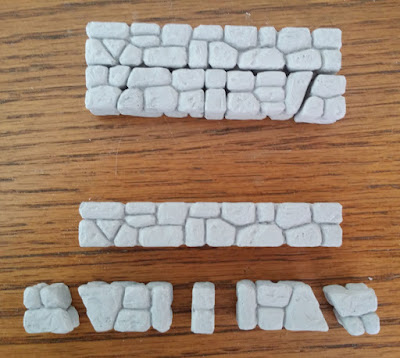
     If you are working on a project with a looming deadline, and need lots of fieldstone walls cast yesterday, you can use other molds to make blocks beyond the basic fieldstone mold. 
     a) You can use the blocks from the flagstone floor mold glued back to back to make a 1"x1"x1/2" block. Yes it looks noticeably different from a fieldstone wall, but if you are working on a project with a "basement area" this will work well for the lower portion. Also it makes for a wall with a completely flat top due to the scrapped side being sandwiched inside the blocks (no irregular block heights). 
     b) You can use the fieldstone rubble mold to make blocks. It takes two castings to get complete blocks, but every little bit helps if you're on a deadline.
     c) If you have the Octagon tower mold, you can use the straight sections to make long blocks.

The long/short angle sections along with a 1/4" block make a 3" long wall section (3" wall block shown on the top).
Hirst Arts Hacks by Knitfink

Two long angled sections along with a 1/4" block will make a 4" long wall section (1" + 3" wall shown on the top).


2) Waste Nothing
     I put a plastic trash bag down over my table when I cast. This catches all the plaster that gets scrapped off. All the plaster bits and dust go into this plastic bowl (I also unmold my blocks over top of it). I break up the pieces and then I can add them to large blocks when I cast them. I usually use this for large molds like the cavern mold and the space corridor edging mold. I fill the molds about half way with plaster, and then add the dry scraps to the blocks. Then I cover them with more plaster to top off the molds.

This is a picture of some holders that I use when painting miniatures. They are soda bottle caps so they already have a nice texture to the edges (these really help with hand fatigue). I fill them about halfway with scrap plaster, and add water. Then when I scrap my molds, I can drop the excess on top of these and scrap them off flat.
Hirst Arts Hacks by Knitfink

Some bottle caps in progress.
Hirst Arts Hacks by Knitfink

After these dry, I run them over some sandpaper to make sure they are smooth. Then I put two coats of high gloss varnish on them, and they are ready to have some minis stuck on them with some poster tack.
Hirst Arts Hacks by Knitfink

Friday, July 1, 2016

Carcassonne Draw Bag

When my gaming group played Carcassonne, I would end up emptying one of my knitting bags to draw tiles. I saw a fabric printing technique for making custom craft labels and decided to use it to print my own fabric to make this bag. After arranging and scanning some game tiles, I printed out the file on some white Kono cotton fabric. I just happened to have a perfect length of matching ribbon too.


Carcassonne Draw bag by Knitfink

Thursday, June 30, 2016

PotM June 2016: Senet Board game Part 3

This is the first project of the month that I haven't finished this year. I was in an accident recently, and the stress of dealing with that didn't leave me in a very creative space.

I did manage to get some paint on the senet board with my airbrush, but it's barely more than base coating and some highlighting. I'll just have to consider the painting of the senet board a separate project from the assembly and come back to it later.

So far I've used Minitaire paint in Muddy Brown, Cracked Leather, and then Mummy

Monday, June 27, 2016

My painting setup

I like seeing how other people set up their painting areas to see if they do something I can carry over to improve my own. With that in mind I figured I would share mine.

On my desk:
Knitfink's painting setup
(not numbered: my paint splattered cutting mat)
1) A paint pot holder made using hirst arts blocks. I've knocked over my paint pots so many times (see cutting mat), and this prevents that from happening.
2) A dropper bottle of Liquitex Flow-Aid solution
3)  I made these holders (hirst arts blocks again) to prevent my wash cups from moving around on me. The white cup is a cleaned greek yogurt container, and the lid is to prevent my cat from drinking out of them. The single holder is for my metallic wash cup.
4) Double wash cup holder with one cup for clean and one for dirty water. Also a space for frequently used tools in the middle.
5) My most used tools - a glass dropper, a paint mixing tool I bought on amazon, small pair of scissors to cut rampant hairs off my brushes, and a pair of tweezers
6) My wet pallet
7) Mixing pallet with wells covered in aluminum foil for easy clean up

My basket of free napkins. Every time you eat out grab a few.
Knitfink's painting setup

My paintbrush holder made from hirst arts blocks.
Knitfink's painting setupKnitfink's painting setup


I store my paints in a rolling scrapbook tower.
Knitfink's painting setup

The first tray is metallic paints. The second is full of my warm color paints, third is cool colors. The fourth blue tray is all my washes, and then below that are my pigments and duplicate paint pots.
Knitfink's painting setupKnitfink's painting setup

The rest of the trays in the chart are full of miniatures that I'm working on. It makes it easy to separate projects by pull out one to work on.
Knitfink's painting setup